Microsoft How-To: Scrum for Everyone
Working with the Microsoft Visual Studio Scrum 1.0 process template.
Microsoft Visual Studio Scrum 1.0 is a new Team Foundation Server (TFS) process template for teams practicing Scrum. Scrum has become a dominant methodology in the software industry in recent years, and teams are in search of tooling to help support their processes and practices. In this article, we'll take a brief look at what it looks like to run a Scrum project using the Microsoft Visual Studio Scrum 1.0 process template on TFS 2010.
Getting Started
As your team gets started, the first thing to do is make a decision about the length of your Sprints. Sprints are time-boxed iterations of work in which your team produces a potentially shippable increment of the product being developed. Your team can decide the appropriate length for you, but most teams choose a length of time between a week and 30 days. The actual length is less important (every team has to find the sprint cadence that works for them), but what is important is that items pulled from the Product Backlog can be delivered within the sprint boundaries.
Once your iteration length has been chosen, you can enter the dates into the Sprint work items in your project. After creating a new project with the Microsoft Visual Studio Scrum 1.0 template, your project is pre-populated with 24 sprints (six sprints across four releases). This can easily be modified -- you may have 10 sprints in your first release, for instance -- but for the purposes of this article we'll use the default sprints as our example.
In Visual Studio, open up Team Explorer and navigate to the All Sprints query. Each Sprint work item returned in this query is mapped directly to an iteration value in TFS. Open the first few sprint work items and enter the dates for your first few sprints. It's not important to enter all the sprint dates at this time, but it's good to add what you know so that your team and Product Owner can begin to get a feel for the product schedule.
Building Your Product Backlog
You likely already have a list of requirements for your project. The next step is to turn these into a list of Product Backlog Item (PBI) work items in your Product Backlog. The Product Backlog is a prioritized list of requirements for your project. Each item on the Product Backlog is represented as a work item called a PBI.
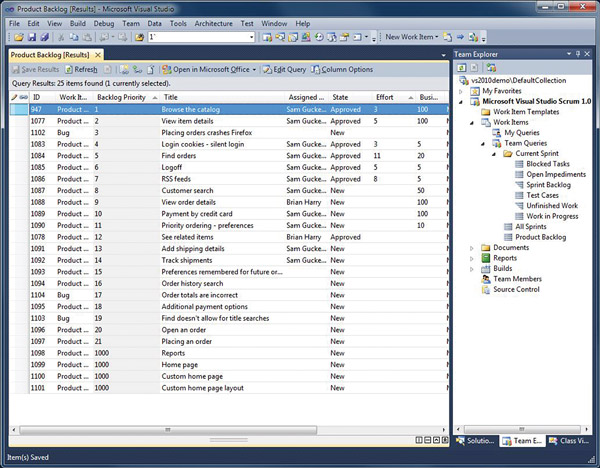
To create a new PBI, click the New Work Item drop-down list from the toolbar and select Product Backlog Item. Your Product Owner will fill out the work item form in detail, including the Title, Backlog Priority, Description and Business Value. These fields are the core of the work item as they describe the item, its relative priority compared to other work on the backlog, and a value that represents the amount of business value it will provide once implemented. After saving the new work item, it will be displayed in the results of the Product Backlog query. The Product Backlog query is defined as all PBIs and Bugs assigned to the root iteration path of your project that haven't been completed.
Each PBI moves through a series of state transitions that track the lifecycle of requirement: New, Approved, Committed and Done.
New: This state is the starting point for all items on the Product Backlog. As new PBIs are entered by your Product Owner they start in the New state and are assigned a default Backlog Priority of 1,000. This is done to ensure that new PBIs are pushed to the bottom of your Product Backlog.
Approved: Your Product Owner moves a PBI to the Approved state when the PBI has been sufficiently detailed and is ready to be brought to the team to be estimated. Most of the time, items near the top of the Product Backlog are in the Approved state, while items toward the middle and bottom are in the New state.
Committed: When the team commits to implementing a PBI during the Sprint Planning Meeting, the state of the PBI is changed to Committed. This state transition indicates that the team will complete the PBI in a sprint.
Done: Finally, a PBI is moved to the Done state when the team has completed all the Tasks associated and the Product Owner has agreed that the PBI has been implemented according to the Acceptance Criteria.
When your Product Owner adds new items to the Product Backlog, it's critical that each item be prioritized appropriately. As the team begins to tackle work sprint by sprint, they work through the items on the Product Backlog in priority order. So, what determines the priority of an item on the backlog? The answer to that question is unique to each situation, but some general rules and guidelines can help a Product Owner make good decisions about priority.
The goal for each sprint is to deliver value to the customer. This goal is grounded in the notion that delivering value early and often will help drive better decision making later in the project cycle. With that in mind, it's important for the Product Owner to consider which items on the Product Backlog will deliver the most value to the customer as compared to the amount of effort required to complete the items. Both the PBI and Bug work item forms have a Business Value field to track this value. Your Product Owner should use this value and the effort field to make good decisions about the relative priority of the work on the Product Backlog.
Acceptance Criteria
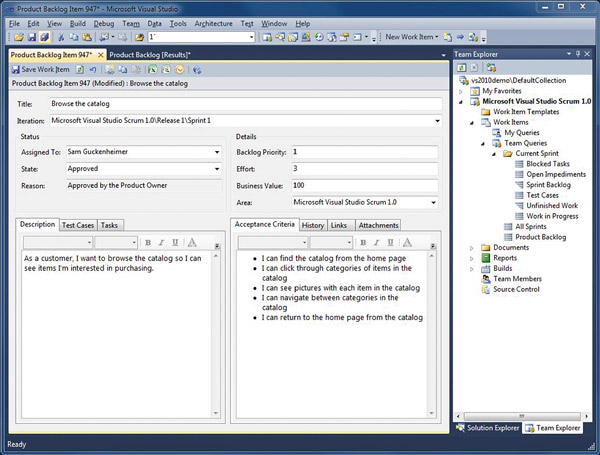
As a Product Owner, one of the most important things you can do with each of your PBIs is to detail the Acceptance Criteria for each item. What is Acceptance Criteria? Put simply, it's the criteria that defines what "Done" means for each PBI. Acceptance Criteria is critical to the success of a Scrum team, as it becomes the handshake between the Product Owner and the team -- it helps define what the team is committing to.
|
|
|
Figure 1. A look at the Product Backlog query.
|
Some of the best interactions on the team happen as the Product Owner and the team review the Acceptance Criteria for each item on the backlog. What emerges is a shared understanding of what "Done" means for each item. "Done" in the Agile world means that something is ready to be shipped to customers. There's no outstanding work, including testing, documentation, setup and so on. Remember that the goal with every sprint is to produce a "potentially shippable increment of work." In order for something to be shippable, all the work needs to be "Done." There are many good formats for writing Acceptance Criteria, but in the end, each criteria should be simple to read and understandable by everyone involved.
Planning Your First Sprint
After your Product Owner has created and prioritized the Product Backlog, your team is ready to get started on its first sprint. The team gathers for the Sprint Planning Meeting, where the team agrees on a goal for the sprint. The goal for the sprint is captured in the Goal field on the sprint work item. The Product Owner then begins to describe the highest-priority PBIs and Bugs on the Product Backlog by reading to the team each item along with its associated Acceptance Criteria. During this part of the meeting, the team is learning about each item on the backlog and gaining an understanding of what it's being asked to build.
After the team has had adequate discussion about the items being considered, it's time to estimate each item. A common practice for Agile teams today is to use an estimation technique like Planning Poker. During Planning Poker each team member has a deck of cards with values representing the amount of effort needed to complete a backlog item. Most Planning Poker cards use the Fibonacci sequence (1, 2, 3, 5, 8, 13 and so on), as it reflects that the team doesn't expect perfect estimates. For example, what's the difference between an estimate of 11 versus 12 when discussing something on the backlog? In truth, there isn't much difference, because estimating at that level of detail is inherently flawed. However, it's easier to compare the differences between an estimate of 8 versus 13, or even 5 versus 13.
|
|
|
Figure 2. Well-defined Acceptance Criteria is vital to a successful process.
|
By limiting the available choices, the team can have more productive discussions about the work involved. After each member of the team reveals their estimate -- simultaneously -- the team members that have high or low estimates are given a chance to explain why they chose their values. Again, the goal of the exercise is not to arrive at a precise estimate; rather, it's to spark conversations that lead to a shared understanding of what "Done" means for each item being discussed. The team can vote again after discussion and will eventually arrive at a consensus estimate. That value is entered into the Effort field of the PBI or Bug work item being estimated.
This process repeats for each of the items presented by the Product Owner until the team believes they have enough work to achieve the sprint goal. The next step is for the team to break down each item into Task work items. Tasks represent the actual work that the team will perform and should encompass all the work involved including testing, documentation, interface design and so on.
Remember, an item isn't "Done" until every-thing is done. For this reason it's important that the team collaborate through this part of the meeting to record all the necessary work. Each task work item is then estimated by the team. As the team details the tasks for each item, it may find that an item is bigger than originally thought. In this case, the team negotiates with the Product Owner to move the item back to the Product Backlog.
To add a Task to a PBI or Bug, switch to the Tasks tab on the work item itself and click the New Linked Work Item icon. Tasks are added as children of their parent PBI or Bug and begin in the To Do state. They can be tracked on the Tasks tab of both PBIs and Bugs.
After all the Tasks have been created, the final step is for the team to make a commitment to the work. This is done by setting each PBI or Bug work item to the Committed state, indicating that the team is committing to complete the item during the upcoming sprint.
The result of the Sprint Planning Meeting is:
- An agreement between the Product Owner and the team on what items from the Product Backlog are to be accomplished during the sprint.
- A list of all the Tasks necessary to complete the items selected by the Product Owner and the team.
The ultimate success of the sprint will be determined at the end of the sprint during the Sprint Review Meeting.
Tracking Your First Sprint
Now that the sprint is planned, the team is ready to get started on the work. It's important that the team doesn't start work on too many backlog items at once. Ideally, the team works together on a backlog item until all the Tasks are completed before moving on to the next item. This helps minimize the risk of reaching the end of the sprint with everything 90 percent completed but nothing actually being "Done."
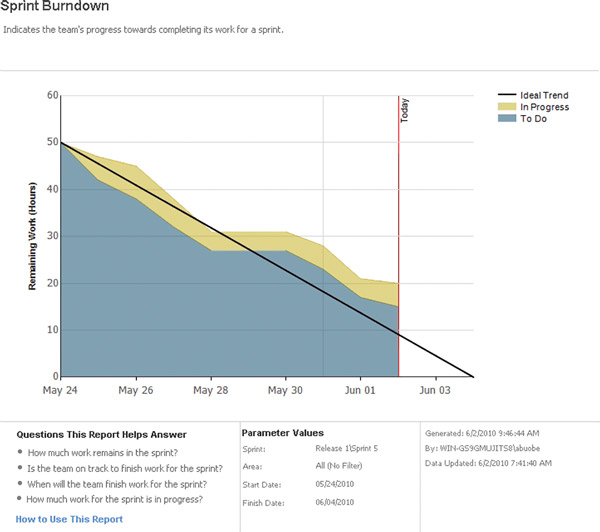
Members of the team begin by selecting the Tasks that they'll work on first. This is accomplished by changing the Assigned To field on a Task work item and setting the State field to In Progress. Team members record daily the number of remaining hours left for each Task they're working on by updating the Remaining Work field. Ideally, each team member only has one In Progress task at a time, so as to minimize the risk of work being left unfinished or partially completed. As team members complete Tasks, the state of each Task is changed from In Progress to Done, and progress is reported at the daily standup.
|
|
|
Figure 3. The Burndown chart offers a glance at sprint progress.
|
During the sprint, the team tracks progress toward completing all the work using the Sprint Burndown chart. The chart clearly indicates the team's progress toward burning down the hours committed to the sprint, as well as tracking the amount of work the team has In Progress. In the example provided in Figure 3, you can see the team has 20 hours of work to complete before the last day of this sprint. The Sprint Burndown can be displayed during the daily standup so that each team member understands how the team is progressing toward meeting its commitment.
分享到:


相关推荐
CDP --- Scrumosaurus SCRUM项目管理项目
Scrum-pres Scrum 概述
任务scrum Task-Scrum是一种任务管理软件,可实现Scrum-board可视化。 该产品尚未开发到最后阶段; 但是,核心功能已经实现并经过测试可以正常工作
Pum Scroker-Scrum扑克远程工作的Scrum团队的优化工具。 创建此代码是为了学习开发技术并为我的团队提供更好的工具。 通过NestJS使用Vue和WebSockets。 拉取请求和问题非常欢迎。产品特点表决您可以投票设定您认为...
Scrum是迭代式增量软件开发过程,通常用于敏捷软件开发。Scrum包括了一系列实践和预定义角色的过程骨架。Scrum中的主要角色包括同项目经理类似的Scrum主管角色负责维护过程和任务,产品负责人代表利益所有者,开发...
React Scrum 扑克基于 Reactjs 的 Scrum 扑克估算工具依赖关系React网络包
名称:Agile SCRUM for Trello boards -------------------- 版本:1.4.7 作者:https://xaviesteve.com 分类:生产工具 -------------------- 概述:使用故事点、项目和进度条为您的 Trello 看板充电。 用于 Trello...
Scrum排行榜Scrum 培训课程的排行榜项目马修的自述提交废话
象卡帕乔SCRUM敏捷方法研讨会
每日更新API描述搭建开发环境首先克隆存储库,并使用包管理器安装依赖项。 如果使用npm,则应运行: $ npm install 或者,如果您使用纱线,则应运行: $ yarn 之后,在运行之前,您需要设置两个配置文件。...
TypeScript Next.js示例 这是一个非常简单的项目,显示了Next.js与TypeScript的用法。 自己部署 使用部署示例: 如何使用它? 使用或执行以引导示例: npx create-next-app --example with-typescript with-...
哈伯特-松弛-scrum 一个Hubot脚本,与Slack的hubot适配器进行虚拟Scrum会面 有关完整文档,请参见 。 安装 在hubot项目存储库中,运行: npm install hubot-slack-scrum --save 然后将hubot-slack-scrum添加到您...
Scrum 应用程序 如何启动应用程序? $ npm 开始 预览应用
远程回顾工具,Scrum Master可以进行冲刺回顾,以包括团队的远程成员。 先决条件 Python 2.x node-gyp需要最新版本的Python 2.x(Node 0.12旨在消除此要求)。 确保在安装过程中选择“将python.exe添加到路径”。 ...
Scrum Nest用户界面该项目是通过引导的。可用脚本在项目目录中,可以运行:yarn start 在开发模式下运行应用程序。 打开在浏览器中查看它。 如果您进行编辑,则页面将重新加载。 您还将在控制台中看到任何棉绒错误。...
If you want to use Scrum to develop innovative products and services that delight your customers, Essential Scrum is the complete, single-source reference you’ve been searching for. Leading Scrum ...
estafet-microservices-scrum:这是主存储库,用于包含scrum演示应用程序的微服务的git子模块。 此外,此存储库包含脚本,这些脚本将为开发人员,测试人员和整个交付团队构建环境
Case studies in this book range from small web startups to large financial institutions, working in many processes including XP, Scrum, and Kanban. <<Who Should Read this Book>> This book is written...
Guia-Scrum-Proyectos-Conservacion:保留下来的权益